There are many types of shelter in the wilderness…but what’s the best survival shelter that you can build when you’re in an emergency situation?
As a broad overview, there are natural shelters, man-made shelters, and even a hybrid of natural and manufactured materials.
Typically, a survival shelter is any structure that can protect you from adverse weather conditions, predatory animals, and insects etc.
Survival shelters can include natural caves, fallen trees, debris shelters, tree hollows, lean-to’s, A-frames, snow caves, and more advanced structures such as teepees etc (which we teach here at SCT).
Shelters come in a large number of designs and styles, and serve a variety of purposes…but one thing is certain: knowing how to construct the right one for the conditions and terrain quickly, can certainly save your life.
Fortunately, regardless of whether you’re in thick bush, snow, or even a desert, building a survival shelter out of natural or man-made materials is a relatively easy process.
But…which one is the best survival shelter for different kinds of weather and terrain?
Figuring out which shelter design is best for the kind of elements you’re up against, the environment you’re in, and the amount of daylight you have left – is a critical decision in a wilderness survival situation.
Usually, the simplest structure is often best, but it depends on what natural resources you have to hand around you, as well as what man-made equipment you have on you at the time.
Remember, too, another critical component of survival is the always-present ‘energy expenditure versus reward’ mantra.
However, generally speaking, time and effort spent constructing and improving your shelter is seldom wasted…as a good night’s rest and protection from the conditions are important factors in survival.
Choosing the right shelter does also depend on whether you’re planning to spend just one night there before moving on (as part of self-rescuing) or whether you’re intending to stay for a few nights and wait for rescue.
It goes without saying that if you happen to find a cave, or a natural hollow in upturned tree roots, for example, then that’s likely going to be your best bet – requiring minimal additional effort.
Often, the type of terrain and environment you’re in will determine what natural resources you have available and what elements you’re likely to face during the night, which will enable you to decide which shelter to choose.
Selecting the best location for your shelter
Choosing the optimal place to construct your survival shelter is one of the most critical aspects of any shelter construction design.
It shouldn’t be close to where water run-off will come into or onto your shelter from a deluge of rain, or be on the ground if you’re in a rainforest / jungle etc.
Your shelter should be located on the leeward side of any prevailing wind and not be situated underneath any deadfall tree limbs (also known as ‘widowmakers’ for good reason!).
These are just a few examples of what to look for in a suitable location.
It should be in the driest spot you can find. Nothing leaches out body heat faster than being wet. Rain and high humidity are often your worst enemy.
Once you’re wet, it is extremely difficult to remain warm after you’ve stopped moving. Metabolic heat from walking or building a shelter etc will keep you warm for a certain amount of time.
After you stop moving around, though, you’ll find it next to impossible to stay warm if you’re wet. This is just one reason why it’s important to ensure your shelter is made waterproof and dry.
It’s important to build your shelter close to natural construction materials and resources you’ll need.
You don’t want to expend more energy than you have to by walking a long way to cut down / find branches etc, and then have to carry them back. It will also increase the construction time dramatically.
Be on the look out for large tree limbs lying on the ground where you want to build your shelter and try to determine if the trees overhead are dead or dying, and likely to drop their branches.
Always locate your survival shelter away from any game trails. This will only invite animals into your shelter or camping area at night.
If a cold wind is blowing, make sure you choose a location that provides some shelter from trees, rocky outcrops, or hillsides etc.
However, don’t build your shelter in the bottom of valleys or too close to lakes where cold air settles at night.
Always avoid locating your shelter in dried up riverbeds, or at the bottom of gullies, ravines, gorges or canyons – even in desert environments – as the danger from potential flash floods is constant.
It’s always wise to check which direction the wind is coming from. You really don’t want to build a shelter that’s open to the wind.
Even if the wind isn’t blowing when you choose your site, it could easily pick up during the night. You can do this simply by trying to feel it on your face. If you can’t feel the wind, look at the lowest levels of clouds, or long grasses (like button grasses), or moving trees.
Best types of survival shelter:
Using A Tarp: Essentially, there are a number of different ways you can pitch a tarp. These include creating a lean-to design…however, at Survival Courses Tasmania, we teach a specific way on our basic course that provides much more protection from the elements.
For a basic lean-to tarp shelter, you just need a tarp and some paracord. Simply tie each end of the tarp to a tree. This type of shelter is not particularly warm and will likely only keep the worst of the rain or snow off you.
In colder conditions (if this is all you have and you don’t have enough time to build a natural shelter), you’ll really need a fire in front of the lean-to to radiate and circulate heat around you.
Or you can create an A-frame tarp design with your tarp. You can also use just a poncho for this; called a ‘hoochie.’
Tie some paracord between two trees at the required height and lay your tarp over it. Then use some rocks, sticks, tent pegs etc to pull the sides of the tarp out and away from you.
This design of shelter provides better protection from the weather than a lean-to shelter, as it is only open on two sides rather than three, which you can also then close off the two ends with natural materials.
A-Frame Shelter: If you have more time and natural resources, you can make a natural A-frame shelter. When built properly, it can keep you warm and dry through reasonably harsh weather.
 The A-frame can also be constructed out of branches and debris, or it can be built using a tarp along with additional natural resources making it more of a hybrid shelter.
Constructing it this way allows you to lift up the A-frame design so that you have more room to stand up inside, as well as being able to incorporate more comfortable features inside for sleeping platforms and warmth etc.
With the addition of a tarp, this really makes for a waterproof roof of your chosen shelter. If you don’t have a tarp, you can always use natural resources to make the roof as well as the frame etc.
This type of design can also allow you to have a smaller fire inside the shelter (or just outside if it’s smaller) – and if you block off the sides beneath your tarp and close off one end, you’ll be much more comfortable.
This is often one of the best longer-term shelters, and would likely be my first choice of which shelter to build in harsher climates…depending on a few factors.
Teepee: This Native American-style shelter has been used for centuries. It’s a tried and tested design which they’ve used right through the harshest of winter conditions.
The main advantage of this design is that the conical shape allows air inside the shelter to circulate around you, therefore, keeping you warmer even without a fire incorporated inside.
First, gather some long branches (poles) and place them together to form the structure for the teepee. This will need some practice before you head out into the field, as it’s quite tricky to make the frame sturdy.
Then, wrap your tarp around the poles creating a conical shape. Some rain or snow will fall through the hole where the poles cross at the top, but you can solve this by placing a large, thick section of moss and soil over it.
You can also construct a much larger teepee where you can incorporate a fire inside (in the centre) to really keep you warm in winter!
The teepee or the wickiup design (below) are some of the best survival shelter designs in a cool or cold climate because of these factors.
Wickiup: This is effectively the same design (and exactly the same frame) as the teepee above, with the exception of using natural tree boughs, fronds, or other bushy plant material to create the ‘skin’ of the shelter, instead of a tarp.
Lean-to: A lean-to shelter is pretty easy to make and can be built to different sizes depending on the size of your group.
You can create walls on the sides fairly easily, or pile on additional debris for extra protection if you have time and the resources.
A lean-to shelter can be strung up between trees, against rocky outcrops, overhangs or steep hillsides etc.
Debris shelter: Basically, you’re using broken tree limbs and branches that have fallen completely or partly to the ground for this shelter design.
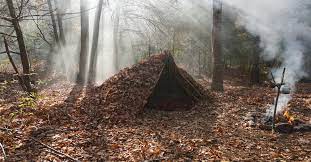 A debris shelter is a really good choice in many survival situations, as most of the work has been done for you and that saves lots of energy expenditure in constructing one from scratch.
You do need to have found a fallen tree branch etc with enough room to accommodate you under its length for this to work, but they’re great when you find one.
You can then modify this shelter in many ways; throw a tarp over the tree limb to form a tarp A-frame, lean smaller fallen branches and other natural ‘debris’ against it as your shelter walls, and so on.
If it’s cold and windy you can completely seal it off by using additional debris to block off the entrance. The more dry debris you pile on the outside and floor of the structure, the warmer it’ll be.
Snow cave: Snow shelters / caves / huts / holes are harder to build properly than you might think! There are a few hard and fast rules when starting your snow construction…but they need to be done right for safety and warmth, primarily.
The most important factor is ensuring that you allow for enough air to consistently come into the snow cave. Ensure you prioritise an air vent (or two) in your design and that you keep it from blocking up overnight.
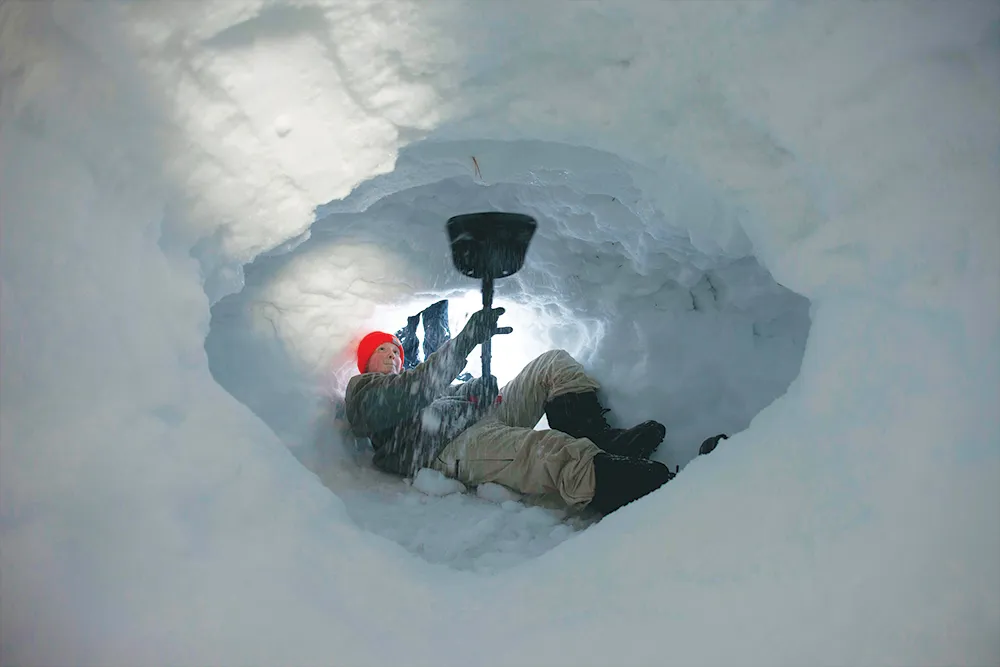 Often, you’ll be trying to get out of a harsh blizzard etc when you start constructing one of these shelters, so the snow may continue to fall once you’re inside, and you need to make sure it doesn’t close off your air supply!
Always pick the leeward side of a snow drift etc when you’re looking for the ideal location for your snow shelter, to get out of the wind.
And remember, you may be cold when you start out – but don’t exert yourself too much in building your snow hole, or you’ll start to sweat, and once you stop, this moisture will quickly lead to you becoming cold.
The second most important design feature is to create what’s called a ‘cold well.’ This is a section of the cave that is lower than where you’re going to sleep, for the cold air to sink into.
Make sure your cave is not too large a volume, either. You don’t want to have to heat up extra space around you and exert even more when building your shelter.
Another handy hint with this type of shelter: if you take the time to smooth down the ceiling from any rough bits of snow and create a small channel around the floor area next to the sides / walls – you’ll mitigate the cold drips of water coming off, dripping onto you as the shelter warms up slightly.
Insulating yourself from the ground
We lose 80% of our body heat through the ground, so this is just as important (if not more!) as ensuring the outside or roof of your shelter is waterproof.
You should try to elevate your bed off the ground where possible. This is critical to staying dry and warm, and helps keep insects away from your bed.
Your platform doesn’t necessarily have to be very high off the ground, it could just be some thick tree branches covered with much softer bedding material (e.g. pine boughs, moss, dry leaves etc.) on top.
Fill the inside of your shelter with dry insulating materials using leafy materials such as dry (dead) leaves, bark, or dry grass.
The material you choose needs to be as light and fluffy as possible to help trap air inside. It’s these insulating properties that will act like a duvet or blanket, trapping warm air next to your body.
Don’t use any living / green material on the inside of your shelter, as the moisture inside of it will leach out and you’ll become wet and then cold.
If the ground is damp, it’s best to place some thicker sticks on the ground first to keep the leafy material away from the dampness.
Make sure you are highly visible
Rescue signals are an essential part of survival when constructing your shelter (one of the ‘Top 5 Survival Priorities)…and they’re typically forgotten about in a survival situation!
Most often, debris shelters are made of natural materials, so they blend into the environment almost too well.
As with any emergency shelter, you want to ensure you’re still highly visible to SAR (search and rescue) teams.
If you’re using a survival blanket etc with a brightly coloured orange side to it as part of your shelter, make sure this side faces up and out so you can be easily spotted.
Hang something bright outside the shelter such as a bright bandana etc to attract the attention of rescuers.
If you’re moving on from your shelter – leave a large directional arrow on the ground made from branches, so rescuers know which direction you’ve headed off in.
For more of our survival and fieldcraft blogs, click here.