For this article, we’re going to cover the best method of building, constructing or laying your fire for the best results…as part of SCT’s bushcraft survival tips.
 Although some of these methods work well as general campfires – the purpose of this article is to provide you with the best knowledge for a survival situation out of the various ways to build a fire.
Method 1 – Teepee Fire Method
With a teepee fire construction, you will be able to make this design of fire quickly and warm yourself, boil water, and cook food.
All of these are essential qualities in an emergency situation and will take care of many of your immediate survival needs.
As with any fire lighting, the tinder is one of the most important components of the initial stage.
In a teepee fire, you are going to create a reasonably large space inside the teepee where you can place your tinder or tinder bundle.
You want quite a lot of tinder for this fire construction to provide enough mass and a longer burn time for igniting the smaller kindling above.
This fire is fairly easy to light so even a small amount of fire, like a fire steel spark or a single match, with a decent tinder bundle of fine fibres etc will get it going.
It’s another benefit of building the teepee fire design and why I think it’s the best fire building method out of the bunch.
Dry grass, plant flower down, dry leaves, birch bark etc are all great tinder options, but we’ve covered this in a previous blog (remember to avoid anything lying on the ground, as this is likely to be wetter).
You will need a good-sized tinder bundle in there at least the size of a large mango. This will make for the easiest teepee fire.
Next comes your kindling, as with any fire. You should gather a couple of different sizes of kindling, with some smaller pencil-sized sticks as well as a number of pieces of larger sticks.
These larger sticks are what you’re going to use to build the structure of the teepee.
Then comes the larger fuel wood…but this is only for once the initial fire has taken and you have nurtured it when it’s small.
Ideally – as one of our bushcraft survival tips – you want a good healthy bed of coals to be established first before you add the larger fuel wood.
At Survival Courses Tasmania we teach our clients / students numerous different skills to enable them to survive in the wild in our series of one day courses.
How To Build Your Teepee Fire
- In wet conditions or if the ground is already wet, it’s always good practice to raise your fire off the ground by about 50mm by using a small platform of dry sticks.
- In soft ground, insert a few of the larger sticks about half a metre in length into the ground to form a rigid ‘teepee’ frame (hence the name).
- Then, you’re going to add lots of kindling against the larger sticks that make up the teepee frame.
- Start with the slightly larger size, then use any small pieces of kindling on the inside – making sure to leave lots of space in the centre.
- When you’re constructing a teepee fire, you need to create the teepee shape with a large empty space at the core.
- This generates the all-important updraft that you want when lighting a fire, and protects the fire in poor weather conditions such as driving wind & rain.
- It’s always wise to protect your fire location from wind and rain where possible, so – even if you have to build a tiny wall to shield your fire additionally – it’s time and energy well spent!
- The centre of the teepee is where you’re going to place your big bundle of kindling you have laid onto the frame made from sticks.
- Lighting the teepee fire should then be easy and reliable with this design, either with a flint spark, waterproof match or ember introduced to the ball of tinder at the core.
- In general, what most people get wrong with this fire is they don’t gather enough tinder, and they often skip the step of pushing good, firm sticks into the ground to form the frame.
Method 2 – Lean-To Fire Lay
This style of fire lay method also gets its name from the structural design it uses.
It features multiple sticks that lean against something, generally a large foundation log, but occasionally a medium-sized stick resting on an angle.
Once again, it’s the empty space created at the core that will be where you place your kindling and tinder, allowing for lots of updraft.
Your fire is then ignited, catching the rest of the structure (the outside of the core) on fire.
Lean-to fires are good for making a small-medium fire that can be used to cook on or provide warmth on cold nights.
How To Build The Fire
The good news is a lean-to fire is really easy to build, and it can be constructed in a short amount of time.
- Choose the best location for what you need the fire for.
- As with most fires (except for underground pit fires), you’ll want to locate your fire somewhere where there’s little wind (or you can construct a windbreak).
- The lean-to fire can be a good option for an above ground fire lay.
- Check for the wind direction and other fire hazards (like overhanging branches) before you start to build your fire.
- Prepare the ground location first by removing debris or rocks etc before you construct your fire.
- One of the main benefits of making a lean-to fire is that they can also work in rainy conditions, too (similar to the teepee method).
- If the ground is damp / wet, you should still place a 50mm layer of sticks underneath your fire first.
- If the location is windy, you can place a thick log or some rocks on the windward side of the fire to keep it protected.
- Alternatively, you can face the opening of the fire – where you light your tinder bundle – point out of the wind.
- Position the large, angled log or stick so that it’s a strong foundation support for the rest of your kindling etc.
- The rest of your fire will lean on this log, so ensure it is strong and sturdy.
- In the sheltered area created by the angled log or stick, you can place the small twigs and kindling, which should lean against the log.
- Then, you can add the larger pieces of fuel on the outside.
- Remember to allow for plenty of space in the centre so that the air can get in to keep the fire burning and generate that updraft.
- Finally, you can even book-end the fire with two larger pieces of wood at either end.
Method 3 – A-Frame Fire
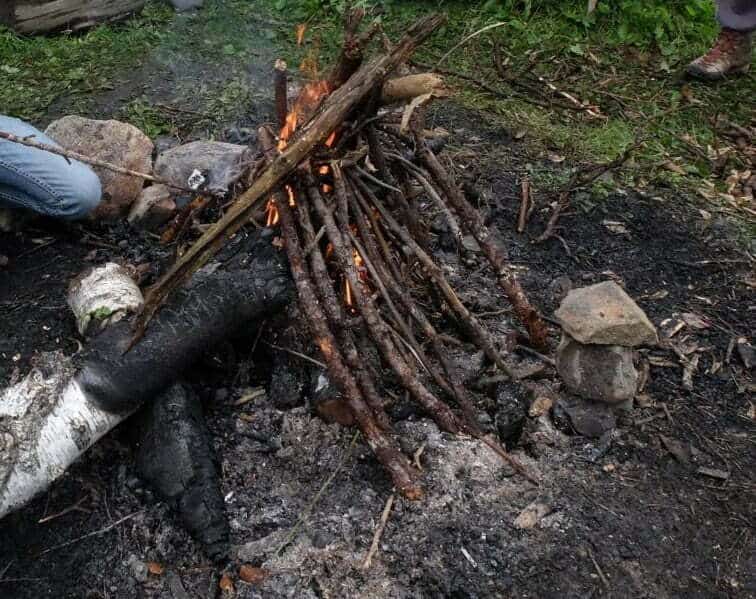 The A-frame fire lay is similar to the lean-to, where both create a roof over the fire that protects it from wind and rain.
With the A-frame though, your central pole will eventually burn and collapse, so it isn’t a good option if you want a long-lasting fire for the night.
It is a good fire for rainy or windy conditions…but it does take more skill to build, it restricts airflow and so is harder to light, and the central pole will eventually burn down.
Like with the lean-to fire, you’re essentially building a scaled down version of the lean-to and A-frame natural shelters.
How To Build The Fire
- Find a fairly long, thick branch or log, making sure it’s sturdy and not rotten. This will be the central pole for your A-frame design.
- Lean the pole on something like a rock or log etc.
- Place small sticks on both sides of the pole to make the sides.
- Keep adding sticks to build up the sides, using larger pieces of wood as you go.
- Build a small fire underneath the main pole with kindling and light the tinder.
- Once the fire starts to take hold, it will ignite the larger sticks above it.
- Continue to add sticks to the sides as they burn.
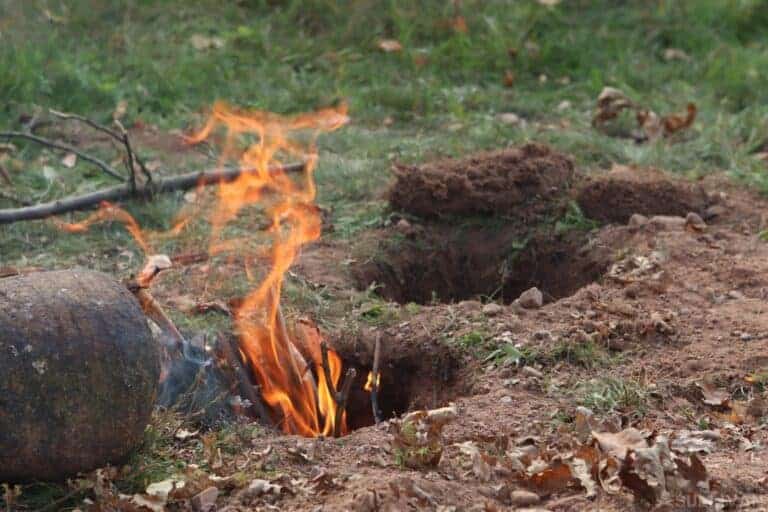
Method 4 – Dakota Fire Pit
A Dakota Fire Pit is an underground fire that is ideal for giving off intense heat, and lighting a fire in high winds – one of the really useful bushcraft survival tips.
Originally conceived by the Lakota Native American tribes, who now reside in the Dakota area of the US.
 Because the fire is protected underground, the flame doesn’t come into contact with the cold air, so the ground acts as insulation, making it burn hotter than many other fires.
With a typical fire on the surface, it is often exposed to the wind. Strong winds can make both lighting a fire and keeping it burning quite difficult.
As the Dakota Fire Pit is beneath the ground, it is naturally shielded from the wind.
Because the fire is underground, there is not as much oxygen to sustain the fire, so a second hole is dug next to the fire hole and connected by a tunnel.
This second, connected hole provides the oxygen supply to the flame and generates the all-important updraft.
How To Build The Fire
- Find a relatively flat surface to build your Dakota Fire Pit. You’ll then need to clear the area of any vegetation, rocks, or other debris.
- Then, start by digging the first ‘fire’ hole.
- The size and depth of the hole will depend on how large you need your fire to be.
- A deeper hole will allow the flame to be be more contained, and a wider hole means you can make a larger fire.
- Once you have dug your first hole that the fire will be in, dig a second hole to supply the fire with oxygen.
- The second ‘oxygen’ hole should be about a foot away from the fire hole, but doesn’t need to be quite as big as the hole containing the fire.
- It’s a good idea to dig this hole at a slight angle, as it will be easier to dig the tunnel to connect the holes later (because you will start off with a better position for digging the connection tunnel).
- Once you’ve dug both holes, you now need to connect them together. It’s best to kneel on the ground for this stage, so you have a better digging position.
- The tunnel should be about as big as your fist hole. This will allow the oxygen to fan the flames, so make sure it is the proper size or else your fire will not be properly supplied with oxygen.
- Lighting a Dakota Fire Pit follows the same techniques of fire building as you would with any other regular fire.
- Gather lots of small, dry material for your tinder bundle to start the fire, and gather kindling to build the fire.
- After your fire has taken, you will be able to move up to larger sticks that burn more slowly.
- For this type of fire design, you will need to cut your larger sticks and pieces of fuel wood into lengths that will fit into the fire hole.
- The Dakota Fire Pit is a great fire for cooking on, due to the intense heat generated from the fire pit.
For more bushcraft and survival articles that will help you in the wild, see our other blogs here.