In this article for SCT’s wilderness survival tips, we’re going to cover 8 ways to start a fire in the field…and I guarantee you won’t have heard of all of them!
As you know, fire is essential in the wild and one of the ‘Top 5 Survival Priorities’ we teach here on our bushcraft and survival courses at Survival Courses Tasmania.
Fire can be useful for all manner of different things, including for warmth, cooking, protection from predators, and for rescue signals etc.
Just as handy is the survival knowledge of how to make a fire with or without waterproof matches.
There are a number of different methods to start a fire in the wilderness, and here’s a list of some tips for the key ones.
- Waterproof & Windproof Matches
We all use matches on a regular basis at home, be it for lighting our wood burners, wood stoves, gas cookers, outdoor fire pits, or candles around the house.
Household matches won’t help you much in the field, as the tiniest bit of moisture or humidity and they’re next to useless.
However (as a survival tip for the wilderness), if you buy matches that are waterproof and windproof, then they’re designed to light in some of the conditions you’ll find in the bush.
I advise everybody who I train in survivalism to always carry with them at least two fire-lighting items, and I recommend these as one of their backups for a handy wilderness survival tip.
- Fire Steel / Flint / Ferro Rod
A fire steel or ferrocerium rod is an ideal item to always have with you for when you’re heading out into the great outdoors, as it’s small, lightweight, and will spark even after being immersed in water.
If I could only take one item with me in the field for lighting a fire…it would be one of these.
Even a half-decent one of these will generate sparks easily and produce a temperature range between 300°C – 2,000°C, with a good one producing sparks up to 3,000 degrees Celsius.
Now, we move on to a few different ways of lighting a fire through the ‘friction fire method’ as part of our wilderness survival tips series of articles.
- Hand Drill
Friction-based fires are not easy at all to get right, and they are certainly the most difficult of the non-match methods.
 There are a number of different techniques you can use to make a fire with friction, but one of the most important aspects is the type of wood you use for the fireboard and spindle.
The spindle is the stick you’ll either spin or slide in order to create friction between it and the fireboard.
If you can create enough friction between these two pieces of wood, you can create an ember that can be used to start a fire with your tinder bundle.
You ideally need a hardwood for the spindle and softwood for the fireboard. Examples of softwood are anything from the coniferous family of trees (e.g. pine, fir, cedar, spruce, juniper).
Deciduous trees are nearly all hardwoods, such as oaks, beeches, birches, chestnuts, elms, maples etc.
as another one of our wilderness survival tips, generally, you can test whether a wood is hard or soft by pressing your thumbnail into the wood and seeing whether it leaves a thumbnail indentation.
Like with all of your fuel wood, kindling and tinder…your pieces need to be bone dry before you can start a fire using the friction method.
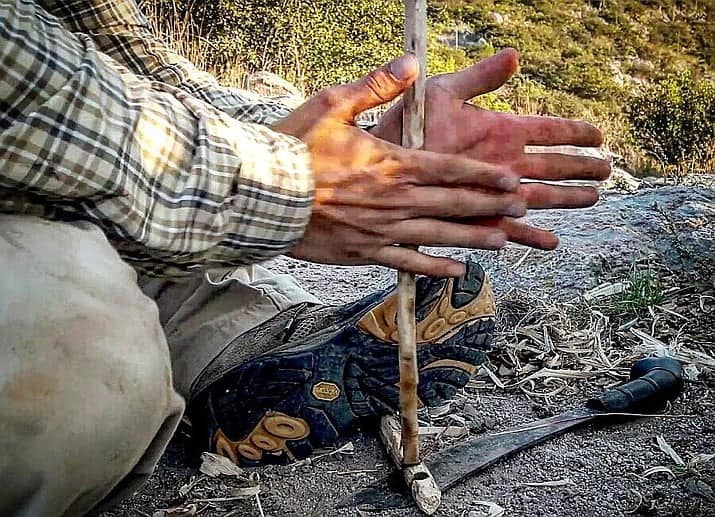
The hand drill method is probably the oldest traditional technique, and the most difficult to do. You’ll need tireless hands, and buckets of tenacity.
How To Use The Hand Drill
Build a tinder nest. Your tinder nest will be used to envelope the ember you create and nurture it into a flame.
You can make a tinder nest out of anything that easily catches fire, such as: dry grass, dry leaves, certain tree barks, and even fluffed-up cotton wool balls.
Cut a v-shaped notch into your fireboard (your base board) and make a small depression adjacent to it.
Place a piece of bark underneath the notch. This will be used to catch the ember from the friction between the spindle and the fireboard.
Start spinning (not too fast at first). Place the spindle into the depression on your fireboard. Your spindle should be about two feet long to work properly.
Maintain pressure on the board and start rolling the spindle between your hands, running them quickly down the spindle. Continue doing this until an ember is formed on the fireboard.
Once you see a glowing ember, tap the fireboard to drop your ember onto the piece of bark. Transfer the bark to your tinder bundle. Gently blow on it or wave it in your hand to start a flame.
- Bow & Drill
The bow drill is another friction-based method that’s similar in design to the hand drill method.
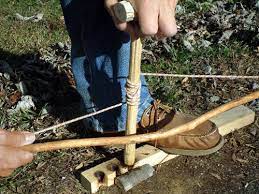 Again, you will need to maintain good speed and pressure to create enough friction to start a fire. In addition to the spindle and fireboard, you’ll also need a socket and a bow.
Make a socket. The socket puts pressure on the other end of the spindle as you’re rotating it with the bow.
The socket can be a flat-bottomed stone or another piece of wood. If you use another piece of wood, try to find a piece that’s harder than what you’re using for the spindle.
When you make your bow, it should be about as long as your arm. Use a flexible piece of wood (like a green sapling) that has a slight curve.
The string of the bow can be just about anything: paracord, a shoelace, thin rope, strip of soaked leather etc.
Find something that won’t break, though! String up your bow and you’re ready to go.
Again, cut a v-shaped notch and create a depression adjacent to it in the fireboard (also called a hearth board). Place your tinder underneath the notch.
Wind a loop of the bow string so it catches around the spindle. Place one end of the spindle in the fireboard and apply downward pressure on the other end with your socket.
Using your bow, start sawing back and forth. The spindle should be rotating quite quickly. Keep sawing until you create an ember.
Drop the ember into the tinder nest and blow on it gently. You should now be able to start your fire.
- Fire Plough
Personally, I find this method the easiest and most energy efficient of the friction fires, which is why we teach it on our SCT courses.
Remember, anything you do in a survival situation needs to be weighed up in terms of energy expenditure versus reward.
If you can achieve the same result by using less energy than another method, that’s less energy you have to source and less water you’ll need to replace.
Firstly, prepare your fireboard. Cut a groove lengthways in the fireboard. This will be your track for the spindle.
Shape the tip of your spindle so that it will have the maximum amount of contact with the inside edges of your groove and place it in the groove of your fireboard.
Start rubbing the tip of the spindle up and down the groove. This will take some time to achieve and will require tenacity.
Have your tinder bundle at the end of the fireboard, so that you ‘plough’ the embers into it as you’re rubbing. Once you catch an ember, gently blow the nest and get that fire going.
There are numerous other ingenious ways to light a fire using compressed air, or electrical components, which can really come in useful in a survival situation in the wilderness or in an urban environment.
- Fire Piston
Believe it or not, fire pistons have been used for hundreds of years as a fire starter.
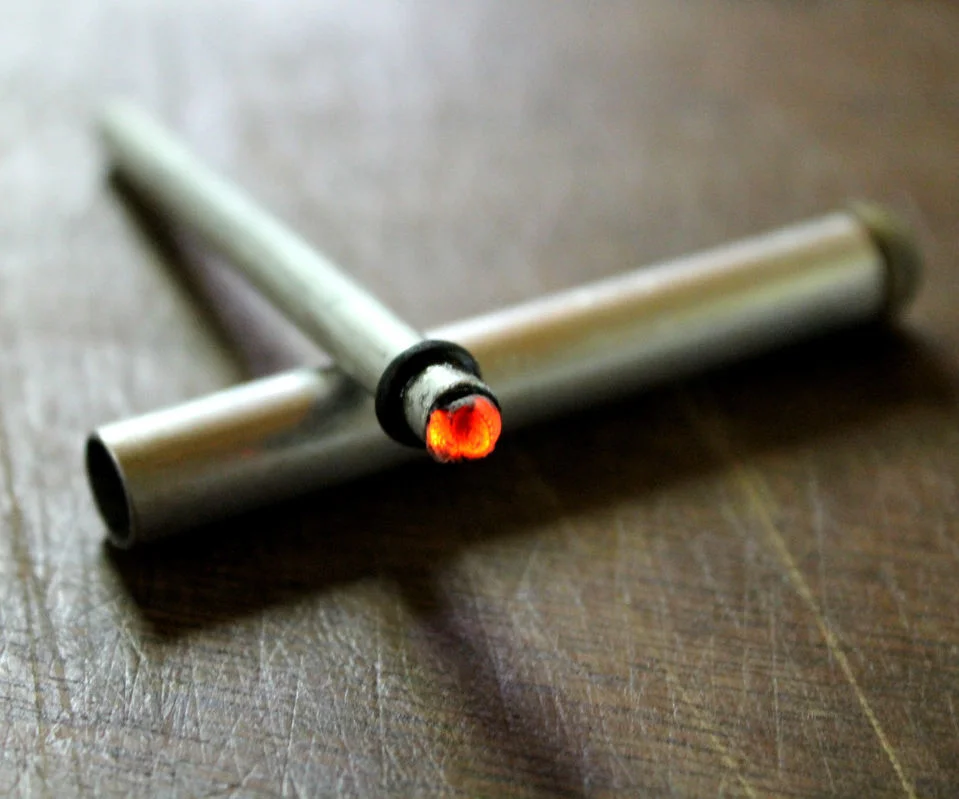 The fire piston consists of a hollow cylinder – sealed at one end and open at the other – with a ‘piston’ or rod that slides inside the tube or cylinder. You’re looking to make it roughly about 15 – 20cm in length and about 8 – 10mm in diameter.
The air is compressed inside, increasing the pressure and temperature until the ignition point of the tinder is reached. It’s the same basic principle of how a diesel engine works.
One way to do it is to insert a small piece of charcoal on the end of your piston, which will then create a glowing ember once the cylindrical piston has been plunged into the tube.
Another way is to place some tinder into a sealed tube and a piston is rapidly pushed into the tube. This may take a couple of attempts – especially if you’ve improvised your tube and piston, and the seal isn’t perfect.
Try to make the fit as airtight as possible. You can use string packed around the piston and lubricated with water or some rubber improvised into a gasket lubricated with grease or oil etc.
In an ideal world (which it never is in a survival situation), the piston would have a handle on the end to allow a firm grip to be applied to it, or a large enough surface area to strike it firmly.
The compression of the air when the piston is quickly forced into the cylinder causes the interior temperature to rise sharply to over 260°C, the autoignition temperature of tinder.
- Battery & Car Headlight Bulb
You can find a 9-volt battery inside most smoke alarms, and garage door openers etc. They’re the rectangular type with the + and – terminals both on top.
You can also use a car battery for this if you can strip out some wires to make a connection with the bulb, as another of our fieldcraft survival tips.
Take the bulb (or globe) out of the car headlights and break the glass bulb cover to expose the tungsten filament.
BE CAREFUL WITH THIS, as you don’t want to injure yourself from the broken glass or to damage the filament (they are very delicate).
Use a piece of cloth or other material to wrap up the bulb and then use a small rock or the back of your survival knife to carefully break the glass bulb.
Carefully pick up what’s left of the light bulb and dispose of the cloth and broken glass.
As with any fire you’re about to start, prior planning is essential. Get your tinder ready, as well as what you’re going to use for kindling as well as the larger pieces of fuel wood.
One you have your tinder and larger wood pieces ready, it’s time to start your fire using the battery and bulb filament.
Carefully touch the metal base of the bulb so they connect with both the positive and negative terminals of the battery. The filament will light up brilliantly.
Touch the bright filament to your tinder and you will instantly have the beginnings of a fire.
- Mobile Phone Battery (even if the phone is completely dead from being immersed in water etc)
NB – THIS METHOD IS VERY DANGEROUS! Please do not try this at home or at work etc…and only use in a life-or-death situation with prior training and, ideally, protective equipment.
Because your mobile phone battery is likely the kind that uses lithium-ion technology, the lithium can be exploited through simple physics (again, with great care!).
Once lithium is exposed to air, it creates a powerful reaction, the bi-product of which produces heat and flammable, explosive hydrogen gas.
Make sure that nobody is close to you when you do this. Then, open the back of the mobile device if it has a battery cover, or gently crack it open if it doesn’t have a cover.
Remove any plastic cover over the metal terminals, so that they are uncovered and exposed.
Next, take your trusty survival knife (or a pocketknife / multitool blade will do) and place the metal surface so that it’s touching both of the terminals on one end of the battery.
Then, use your knife to carefully pierce the large flat side of the battery and quickly move the battery to your tinder bundle, holding it as far away from your face and body as you can.
In a matter of seconds, the battery will start hissing as the violent chemical reaction takes hold and more and more heat will be generated, quickly turning into large amounts of shooting sparks and flames.
For more of SCT’s fieldcraft and wilderness survival tips, see our other blogs here.